Custom Page numbers in Microsoft office word
I am glad you are here to read the post. If you want to skip a bit of story thing than leave two paragraphs below this line, and read from "Follow these steps".
Hence they thought that it is quiet a tough job for them as they were from civil and mechanical engineering branch and didn't even moved there fingers on keyboard to type a little, very common query on google like- "Set Custom page numbers in Microsoft word". So I thought of writing a post on this topic, getting a reason to share my blog's link to others.
Follow these steps:-
- Take a copy of your word file in case of some failure from your side.
- Open your word file(In which u want to set custom page numbers).
- Here I am using screenshots of a word file having total 8 pages.
- Let the requirements be like:
- First page should not have page number.
- Second page number should have Roman page number "i" and so on up to page number 6.
- Normal page numbers should start from 7th page number and continue till the end.
- Note : Your requirement may differ but I am covering three different things in this topic.
- Now first of click on ¶ sign, which you will find in Home Tab, to show up the formatting done in that word file.
- After clicking on this ¶ sign you will be able to see all the formatting like new line mark, page break, section break, and similar things.
- This is just to check if there is any unnecessary section break which is to be removed.
 |
| show/hide formatting |
- If you find out any unnecessary section break, than just remove that whole line to remove the section break by selecting it this way-(see in the image)
 |
| remove section break |
- Next insert a footer with page number or else insert page number if you want only page number.
- Go to Insert->Footer/Page-Number.
- As you can see in the image every page is now having a page number accordingly.
- We want our second page as the roman first page and no page number on the first page.
- To do that we will break the link between the footer of second page and first page completely
- First go to the start of page 2(that is the page from where you want to begin the custom page numbering), to insert section break:
- Go to Page layout->Break-> Next page(see image below).
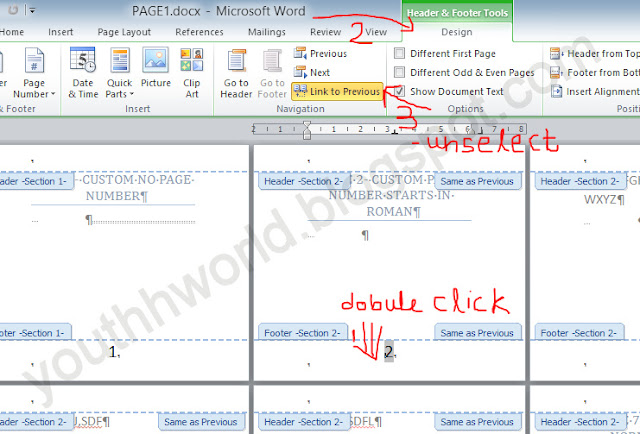
- Now double click on the footer of that page(here page 2), to edit it, and in the design menu un-select the selected "link to previous" button.

- This two step illustrates that you have now a different section in your document and it's page number is not linked with the previous section's page numbers.
- Now, being in the edit mode of footer do this:
- Go to design->Page Number->Format Page Numbers...(see image)
- In the pop-up window select the preferred page number style (here Roman needed).
- And the don't forget to change the start at" to 1 (Or whatever the style has 1, like roman has 1= i)
- Now my word file looks like this at this stage:
- As you can see clearly according to the page numbers there are two different sections.
- So we just have to clear the footer of first page and that wont effect other footers as this footer is not linked to footers below it.
- Note: If this page would have been somewhere in between then we would have broken the link of the footer of this page and the previous page, and after that only we can clear the footer of this page. (which is not needed in this case because the page has no previous page).
- If you have read the whole post from beginning then the third requirement can now be obviously fulfilled by making another section at page 7 and then breaking the link between the footer of page 6 and 7 as done for page 1 and 2.
- And then editing the footer of page 7 and selecting the page number format as normal number and changing the start at to '1' the requirement gets fulfilled.
- After the whole formatting is done you can dis select ¶ sign - if you have not already done after removing the unnecessary section break.
- Now if you do not find the article fruitful, feel free to mention in the comments.
Video for this article:
Thank you guys for reading - Stay Happy HappyReading


Comments
Post a Comment